Jan 12, 2020 | Card Tutorial, Spring, Stampin Up, Tutorial |
Get the country club tailored look with the Clubhouse stamp set. The wording and sentiment are on the inside of the card and it lets them know exactly how you feel. Having the golf balls on the front is my favorite part of this card.
Supplies:
• Stamp Sets – Clubhouse (151583)
• Card Stock (CS) – Whisper White (140272); Basic Black (121045); Basic Gray (121044); Smoky Slate (131202)
• Ink Pads – Tuxedo Black Memento Ink (132708)
• Misc. – Golf Club Dies (151580); Tailored Tag Punch (145667); Country Club Designer Series Paper (151314); Basic Black Stampin’ Write Marker (100082); Multipurpose Liquid Glue (110755); Paper Snips (103579); Bone Folder (102300)
Measurements:
• Basic Black CS: 4-1/4” x 11” scored in half at 5-1/2”; 3-1/2” x 4-3/4”; scrap for punching
• Basic Gray CS: 4” x 5-1/4”
• Smoky Slate CS: 3-3/4” x 5”
• Country Club DSP: argyle pattern 3” x 4-1/4”
• Whisper White CS: 4” x 5-1/4”; scrap for die cutting

Instructions:
1. Fold the card base along the scoreline and burnish with a Bone Folder.
2. Glue the Basic Gray, Smoky Slate and Basic Black CS layers onto the front of the card base.
3. Next, glue the DSP layer onto the Basic Black CS layer.
4. Punch a scrap of Basic Black CS using the Tailored Tag Punch.
5. Cut out the golf bag image from the DSP using Paper Snips.
6. You will then have to glue the golf bag image onto the punched tag.
7. The punched tag will now have to be glued onto the DSP layer.
8. Die cut the 3 golf balls from the DSP using a banner die the Gold Club Dies, and glue it onto the DSP layer.
Inside:
1. Draw shading onto the die that cuts 3 tiny golf balls using a Basic Black Stampin’ Write marker, and use it to die cut a scrap of Whisper White CS.
2. On the Whisper White CS layer, stamp the sentiment in black ink.
3. Add the 3 tiny golf balls beneath the sentiment (with glue).
4. Finally, glue the Whisper White CS layer onto the inside of the card base and you are done.
Dec 30, 2019 | Tutorial |
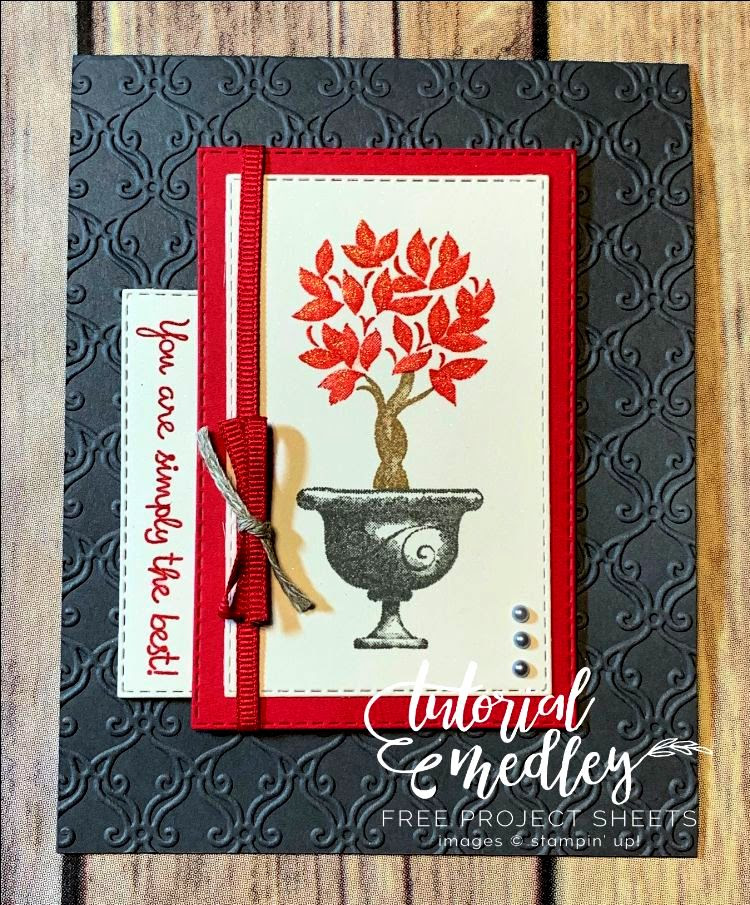
This multi-occasion stamp set with 13 images is RETIRING this week, on January 2. Click on the image to go directly to it.Supplies: - Stamp Sets: Beauty & Joy (150518), Varied Vases (146644)
- Cardstock: Shimmery White (101910), Basic Gray (121044), Lovely Lipstick (146970)
- Ink: Lovely Lipstick (147140), Basic Gray (149165), Crumb Cake (147116)
- Tools & Accessories: Paper Trimmer (152392), Paper Snips (103579)
- Miscellaneous: Stylish Scroll Embossing Folder (150665), Stitched Rectangles Dies (148551), Clear Wink of Stella Glitter Brush (141897), Lovely Lipstick 1/8” Grosgrain Ribbon (146952), 3/16” Braided Linen Trim (147808), Metallic Pearls (146282),SNAIL Adhesive (104332), Stampin’ Dimensionals (104430), Multipurpose Liquid Glue (110755), die-cutting and embossing machine, household tape
Measurements: - Basic Gray card base: 4-1/4” x 11”, scored at 5-1/2”
- Shimmery White: 2-3/4” x 4-1/2” and scrap about 3-1/2” x 1-1/4”
- Lovely Lipstick: 4-1/4” x 2-3/4”
- Lovely Lipstick ribbon: 4-1/2” and 5”
- Braided Linen Trim: about 3-1/2”
Instructions: - Align Stylish Scroll Embossing Folder on card base and run through a die-cutting machine.
- Stamp topiary pot in Basic Gray on Shimmery White Cardstock then the stalk in Crumb Cake and, finally, the leaves with Lovely Lipstick. Die cut, so the topiary is centered, with the rectangle that is 2-1/4” x 3-1/2”.
- Die-cut Lovely Lipstick with rectangle that is 2-5/8” x 4”. Adhere this layer to topiary piece with SNAIL Adhesive.
- Stamp sentiment with Lovely Lipstick ink on Shimmery White Cardstock. Die cut with rectangle that is 1-5/8” x 2-15/16”. Using SNAIL, adhere sentiment to back of Lovely Lipstick so it aligns with the bottom of the Shimmery White topiary piece.
- With a very light stroke, brush Wink of Stella over the Lovely Lipstick stamped leaves.
- With SNAIL on the back of the Lovely Lipstick Cardstock piece, attach 5” strip of Lovely Lipstick ribbon vertically along left side of the main focal point piece. Secure ends in back with household tape.
- Affix the whole focal point piece to the card base with Stampin’ Dimensionals.
- Fold over 4-1/2” length of Lovely Lipstick ribbon so it appears like an untied bow then tie the Braided Linen Trim around it firmly. Trim ends to even them out with Paper Snips. With a dot of Multipurpose Liquid Glue adhere the bow to the vertical ribbon.
- Adhere three Silver Metallic Pearls in lower right corner of topiary piece.
- Allow ribbon to dry.
Remember, you do not have to invent the wheel to be creative, just copy this project! Did you make it with your own hands? Then you have created! Order by clicking on any image in this email or by linking to my ONLINE STORE. |
|
Dec 16, 2019 | Shop, Stampin Up, Tutorial, Uncategorized |
This card is being featured as a holiday card but you can easily skip the inside, change the paper on the front, and make it for pretty much any occasion. Also, change the colors and create a card featuring your postal carrier!

Supplies:
Stamp Sets – (149355) You Always Deliver; (150536) Holiday Haul; (150471) Holly Jolly Christmas
Cardstock and Paper – Whisper White (100730); Cherry Cobbler (119685): Shaded Spruce (146981); Wrapped in Plaid Designer Series Paper or “DSP” (149596)
Stamp Pads – Memento Tuxedo Black (132708); Soft Suede (147115)
Miscellaneous – Neutrals Markers (Soft Suede) (147158); Blender Pens Combos: Basic Black (447942); Cherry Cobbler (144598); Crumb Cake (144601); Petal Pink (147272); Shaded Spruce (147938); Smoky Slate (145058); Soft Suede (147273); Holiday Rhinestone Basic Jewels (150457); Stampin’ Up! logo sticker from a product (I got mine from the sticker on the bag for Tear and Tape); SNAIL Adhesive (104332)
Measurements:
• Shaded Spruce: 5 ½” x 8 ½” score 8 ½” side at 4 ¼” (card base)
• Whisper White: 2 ¾” x 4 ½”; 5 ¼” x 4”; ½” x 1”
• Cherry Cobbler: 3’ x 4 ¾”
• Wrapped in Plaid DSP: 5 ¼” x 4”
Instructions:
1. Fold Shaded Spruce cardstock in half. This is your card base. Glue Wrapped in Plaid piece to front of card base.
2. See picture for placement. On 2 ¾” x 4 ½” Whisper White cardstock, stamp mail (UPS) man, boxes, and saying in Memento ink. Stamp truck in Soft Suede. To “fill in” truck, color the ½” x 1” piece of Whisper White cardstock with Soft Suede marker. Then glue on back of truck. Color in boxes and man with Blender pens. Draw lines under man and truck with Light Basic Black and Light Smoky Slate Blender pens. Glue Stampin’ Up! Logo sticker on largest box.
3. Glue this stamped Whisper White cardstock on Cherry Cobbler cardstock. Glue this to front of cardbase angled (see photo for placement).
4. Stamp sentiment and Santa on 5 ¼” x 4” Whisper White piece in Memento ink. Color in with Blender Pens. See picture for placement and colors. Glue to inside of card.
5. Affix 3 Holiday Rhinestones (largest) to front of card. See photo for placement.
Remember, you do not have to invent the wheel to be creative, just copy this project! Did you make it with your own hands? Then you have created!
Order by clicking on any image in this email or by linking to my ONLINE STORE.
Dec 12, 2019 | Birthday, Congratulations, Stampin Up, Tutorial |
You can celebrate in style with the Sip Sip Hooray stamp set. The colors of the glasses add character to the card and anyone would remember it in years to come.

All images © 1990-2019 Stampin’ Up!®
Supplies:- Stamp Sets: Sip Sip Hooray (150526) or bundled with dies at a discount (153045), Itty Bitty Birthdays (148618)
- Cardstock: Thick Very Vanilla (144237), Gorgeous Grape (146987), Mossy Meadow (133676), Cherry Cobbler (119685), Pumpkin Pie (105117), Basic Black (121045)
- Ink: VersaMark
- Tools & Accessories: Black Stampin’ Emboss Powder (146956), Embossing Buddy (103083), Heat Tool (129053), Sip & Celebrate Dies (150668) or bundled with stamp set at a discount (153045), Ornate Frames Dies (150664), SNAIL Adhesive (104332), Multipurpose Liquid Glue (110755), Stampin’ Dimensionals (104430)
Measurements:
- Card Base: Thick Very Vanilla 5-1/2” x 8-1/2”. Fold in half.
- Cardstock #2: Basic Black 3-1/2” x 4-3/4”
- Cardstock #3: Thick Very Vanilla 3-3/8” x 4-5/8”, scrap for die-cutting.
- Cardstock #4: Gorgeous Grape scrap. Die-cut.
- Cardstock #5: Mossy Meadow scrap. Die-cut.
- Cardstock #6: Cherry Cobbler scrap. Die-cut.
- Cardstock #7: Pumpkin Pie scrap. Die-cut.
Instructions:
- Die-cut Gorgeous Grape, Mossy Meadow, Cherry Cobbler and Pumpkin Pie cardstocks with Sip & Celebrate Dies. Adhere to Very Vanilla layer with liquid adhesive. Clip away excess cardstock that extends beyond layer. (See image below)
- Adhere Very Vanilla layer to Basic Black layer. Adhere layers to card front with dimensionals.
- Stamp sentiment image from Sip Sip Hooray stamp set on scrap Very Vanilla with Versamark ink. Heat emboss with Black Emboss Powder. Die-cut with Ornate Frames Dies. Adhere to card front with Stampin’ Dimensionals.
- Stamp sentiment image from Itty Bitty Birthday stamp set on card inside with Versamark ink. Heat emboss with Black Emboss Powder. (See image below)


Remember, you do not have to invent the wheel to be creative, just copy this project! Did you make it with your own hands? Then you have created!
Order by clicking on any image in this email or by linking to my ONLINE STORE.
Nov 29, 2019 | occasion, Shop, Stampin Up, Sympathy, Thankful, thinking of you, Tutorial |
You can create a beautiful magnolia image on a card super fast. I received a similar card last month from a member of my Demonstrator team. My jaw dropped as it was SO simple yet so elegant and perfect just as it was. I had to make some for myself as birthday thank you notes and I sent them out.

All images © 1990-2019 Stampin’ Up!®
I chose a light color so I could write on the inside. Any light color works (the card I received from my downline was Balmy Blue) OR choose a darker color and use a Whisper White or Very Vanilla cardstock piece to write on and adhere inside (4″ x 5-1/4″). Wouldn’t the Seasonal Wreath 3D embossing folder look great as a holiday note card or thank you? (pg. 199 of our annual catalog or see it HERE). If you make groups of these, they are wonderful gifts if you insert them into our Acetate Card Boxes (noted below).
Supplies:
Stamp set: Good Morning Magnolia (149298)
Ink: Soft Sea Form Classic Stampin’ Pad (147102)
Paper: Soft Sea Foam Cardstock (149688)
Miscellaneous: Magnolia 3D Embossing Folder (149579), 3D Embossing Folder Plate (149658), Whisper White Medium Envelopes (107301), Acetate Card Boxes [not shown] (144628), Bone Folder (102300), Die-cutting machine
Measurements:
Soft Sea Foam card base: 5-1/2″ x 8-1/2″, score at 4-1/4″ then fold crease with Bone Folder
Instructions:
- Run Soft Sea Foam cardstock and Magnolia 3D embossing folder (using the 3D Embossing Folder Plate) through your die-cutting machine.
- Fold card.
- Using Soft Sea Foam ink, stamp corner of the front of Whisper White Medium Envelope.
- For gift giving: make sets and insert into Acetate Card Boxes (each holds up to 5 sets of cards with envelopes). See them HERE. Note that the wording is incorrect on that one item; the box holds USA standard A2 cards and envelopes. It measures 4-7/16″ x 5-13/16″ x 5/8″.
Remember, you do not have to invent the wheel to be creative, just copy this project! Did you make it with your own hands? Then you have created!
Nov 12, 2019 | Card Tutorial, Christmas, Snowflakes, Tutorial |
This card is perfect for a cold winter night in December. Usually, it means the holidays are approaching. This is a perfect card to bring a snowy night to life. I love the colors that represent the cold and the Winter. You can add some glitter for a more dominant effect.

All images © 1990-2019 Stampin’ Up!®

Supplies:
Stamp Sets: Peaceful Boughs (150541)
Cardstock and paper: Night of Navy (100867), Whisper White (100730), Feels Like Frost Designer Series Paper (150444)
Ink: Night of Navy (147110), Seaside Spray (150085), Versamark (102283)
Tools & Accessories: 1 ½” Circle Punch (138299), Embossing Buddy (103083), SNAIL Adhesive (104332), Stampin Dimensionals (104430), Shimmer White Embossing Powder (149511) 5/8″ Whisper White Flax Ribbon (148764), Rhinestone Basic Jewels (144220) Multipurpose Liquid Glue (110755), Heat Tool (129053), Snowfall Accents Puff Paint (150691), Shimmer Paint Champagne Mist (147044) mixed in spray bottle with Isopropyl Alcohol, Die Cutting Machine
Measurements:
Card base: Night of Navy 8 ½” X 5 ½” then score at 4 ¼”. Plus scrap for branch and sentiment tag
Whisper White: two pieces 4 ¾” X 3 ½” plus scrap at least 2″ x 2″
Designer Series Paper: Feels like Frost 5 ¼” X 4”
Instructions:
Using 1 ½” Circle Punch, cut circle from Whisper White
Hold circle onto Whisper White cardstock where you want your moon and lightly sponge around outside of circle getting gradually getting darker as you move out away from circle. You may hold circle in place by hand or by using Washi Tape. Other tape may cause it to tear when removed.
After outline of moon with light ink is completed, start sponging with Night of Navy ink, working out to all the edges, blending as best as you can. You may need to “sponge off” some to prevent sky getting too dark. When complete, you can remove the circle.
Use stamp with dots and with Versamark ink, stamp randomly on the card to make it look like snow. Cover the dots using the Shimmer White Embossing Powder.
With Heat Tool, emboss the snowflakes taking care to not burn your paper.
Cut out the tag and branch using the dies from Beautiful Boughs.
Use the Snowfall Puff Paint to randomly place on branches then heat emboss.
Stamp the sentiment onto the tag using Versamark and White Embossing Powder (words are more clear and crisp with plain white vs shimmery white embossing powder). Heat to emboss the words.
Adhere Designer Series Paper to card base.
Adhere branch to sponged Whisper White card front then wrap ribbon around it at the bottom, tie it, then add sentiment piece on top of it.
Adhere branch/moon piece to Designer Series Paper.
Lightly spritz Champagne Glimmer Paint mixture over front of card (optional but very pretty)
Add Whisper White on inside of card so it can be written onto.
Place a rhinestone on each side of the tag sentiment where the holes are.
Remember, you do not have to invent the wheel to be creative, just copy this project! Did you make it with your own hands? Then you have created!
Order by clicking on any image in this email or by linking to my ONLINE STORE.
 All images © 1990-2018 Stampin’ Up!®
 All images © 1990-2018 Stampin’ Up!®


